Slicers are used to filter queries using hierarchy elements from the data model. Slicer settings allow you to change the way the slicer is visualized, the way it operates, and how it's styled.
Accessing the Slicer Settings panel
Configure the slicer preferences from the Slicer Settings panel. Start by clicking the slicer's context menu (ellipsis) and select Settings from the context menu:
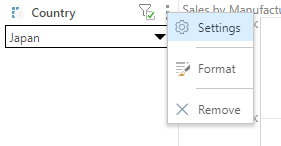
The Slicer Settings panel opens along the bottom of the canvas. The panel features tabs along its left; each of which exposes options relating to various slicer settings.
Note: If your Slicer is a Binary Parameter, the dialog includes a subset of standard Slicer Settings, see Binary Parameter Settings in Discover Pro. If your Slicer is a Date Calendar, the dialog includes some additional Slicer Settings, see Calendar Slicer Settings.
Slicer Settings
Type
The Type settings let you change the slicer's title and type:
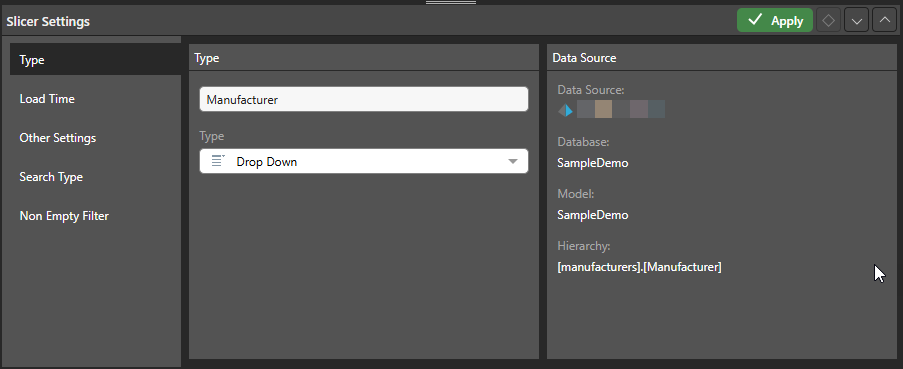
- Title: Edit the slicer title.
- Type: Select a slicer type from the drop-down menu. Slicer types include drop-downs, buttons, and so on. When you change the slicer type, you change both the appearance of the slicer and its settings.
- Data Source: the Data Source panel displays the data source metadata, including the data source, database, data model, and the hierarchy used in the filter.
Slicer Type
The slicer type drop-down offers the following options:
- Drop Down: Adds a drop-down list that you can select one slice from.
- Multi Select Drop Down: Adds a drop-down list that you can select multiple slices from.
- Single Select Tree: Supports 'regular' hierarchies in both cube and SQL models. Adds a single-select tree, which you can navigate through to find the relevant element.
- Multi Select Tree: Supports 'regular' hierarchies in both cube and SQL models. Adds a multi-select tree, which you can navigate through to find and select relevant elements.
- List Box: Adds a single-select list within a box container.
- Multi Select List Box: Adds a multi-select list within a box container.
- Text Box: Adds a textbox with drop-down.
- Buttons: Adds single-select buttons, rather than a list.
- Multi Select Buttons: Adds multi-select buttons.
- Date Calendar: This calendar tool is a specialized slicer visualization designed to make it easier to use date-time hierarchies and their associated calculations. The date-time picker is automatically generated at runtime when using the dateKey hierarchy to create a slicer. As with other slicers, the date-time picker slicer can be customized from the slicer settings.
Date-Time Pickers are only supported for SQL models. This functionality is not currently supported for MS OLAP, Tabular, or SAP BW.
A Toggle is a special slicer visualization type that is only applicable to global binary parameters.
- Click here for more information about slicer types.
Load Time
The load time settings determine which of the slicer's elements will be automatically loaded when the report is opened:
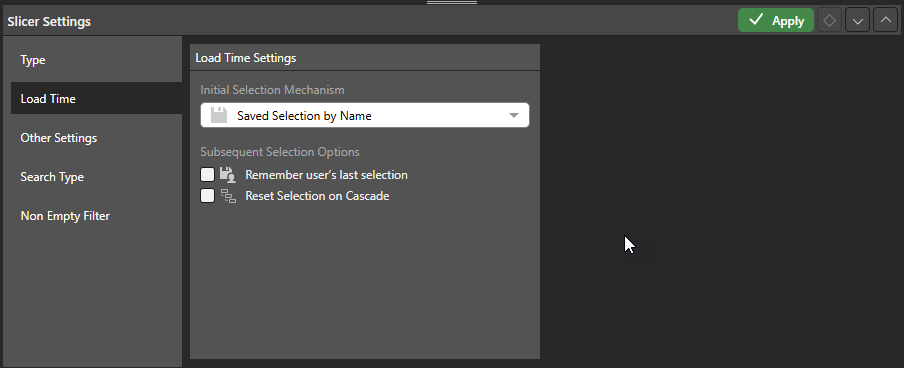
Initial Selection Mechanism
The initial selection mechanism determines which slice will be automatically loaded when the user opens the report.
Saved Selection by Name
Select the initial slicer selection by name when the report is opened.
Saved Selection by Position
Select the initial slicer selection by its position when the report is opened. This is useful if the slicer is based on a custom calculation that shows, for example, the top 10 products. You might want to automatically load the top selling product. In this case, the slicer position needs to be saved.
First Member
Automatically select the first member in the slicer when the report is opened.
Last Member
Automatically select the last member in the slicer when the report is opened.
Subsequent Selection Options
Subsequent selection options determine whether the user's slicer selection will be saved. Any selection will override the Initial Selection Mechanism (above).
Remember user's last selection
Select the Remember user's last selection checkbox to save the current user's saved slicer selection. Each time the user saves the report, the currently selected slice will be saved, and that slice will be automatically loaded when the report is next opened by that user.
If this option is not enabled, the given Initial Selection Mechanism will be loaded every time the user opens the report.
Reset Selection on Cascade
Select this option if the given slicer is being cascaded to. For instance, if you've configured a cascading slicer that cascades from Country down to State, check this option for the State slicer to apply the given slice value modes to State.
In this scenario, if Last Member is set as the load mode, then the last member in the state slicer will automatically be selected whenever a country is selected from the parent slicer. Then, when United States is selected from the country slicer, Wyoming will automatically be selected form the state slicer; when Australia is selected, Victoria will automatically be selected from the state slicer.
Other Settings
From the Other Settings tab, you can disable and enable the filter button, background chips, and auto run for the slicer:
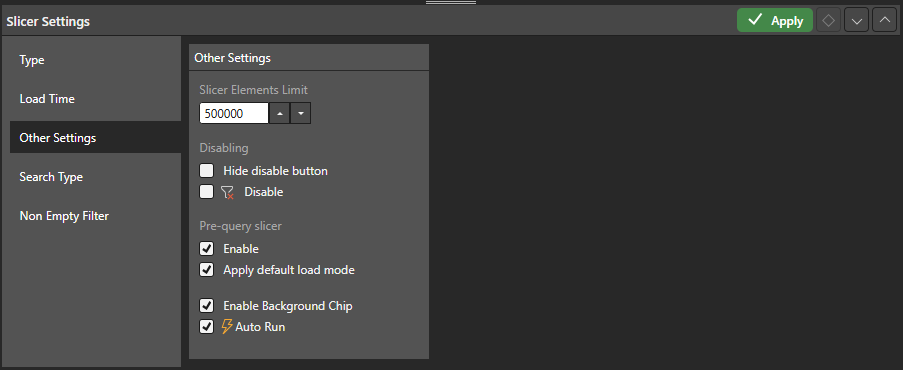
Slicer Elements Limit
Set the maximum number of slicer elements to include in the slicer. The limit set here cannot exceed the limit set from the user defaults.
Disabling
Each slicer features a filter button alongside its context menu. This button is used to enable and disable the filter as needed. The filter is enabled by default, meaning that whenever the report is opened in Discover or Present, it's automatically filtered.
The default filter behavior can be disabled (meaning that, by default, the visual will not be filtered unless the user enables the filter), or the filter button can be hidden entirely.
Hide disable button
Hide the disable button so that users cannot disable or enable the slicer.
Disable
Change the default slicer behavior to disabled. When the report is opened in Discover, it won't be filtered unless the user enables the slicer by clicking its filter button or making a slicer selection.
Filtering can also be enabled or disabled from the slicer itself, by toggling the funnel icon.
Pre-query slicer
Pre-query slicers can be used to set the slicer selections for specified slicers and parameters on opening the discovery, before the query is loaded.
Enable
Select the Enable checkbox to indicate that the query should not be run until the user specifies their slicer selections. The effect of this selection is that the Pre-Query slicer dialog opens and the user is prompted to select either bookmarks or individual selections for their discovery, publication, or tabulation slicers in the Pre-Query slicer dialog.
Note: The Pre-Query slicer dialog opens automatically when you open the discovery, presentation, or tabulation in its app, the discovery in the Viewer, or the presentation at runtime. If you view the discovery or presentation in the Hub or as an Embedded visual, you will need to click the Make Pre-Selections option to open the Pre-Query slicer dialog.
Apply default load mode
Use the Apply default load mode checkbox to indicate which options should be selected in the Pre-Query slicer dialog by default:
- Select the checkbox to use the default slicer selection.
- Clear the checkbox to use the last selected slicer in the Pre-Query slicer dialog.
- Click here for more information about Pre-Query Slicers
Enable Background Chip
Select this option to enable background filtering for single elements. Click here to learn more.
Auto Run
Controls the auto run behavior associated with this slicer. Clear the Auto Run checkbox to indicate that you do not want to apply new selections made from the slicer immediately. The purpose of this option is to allow users to only apply the filtering associated with their slicers once they are ready, perhaps once they have made all their intended slicer selections.
Enable or disable Auto Run for this slicer:
- When enabled, the filter applies automatically as soon as a new slice is selected. This is the default behavior.
- When disabled, the filter does not apply automatically (the query will not be run) when a new slice is selected; instead, a lightning bolt icon indicates that the slicer change needs to be applied manually.
- Click here for more information about Running Slicers
Search Type
Set the search type for slicers that include the search facility:
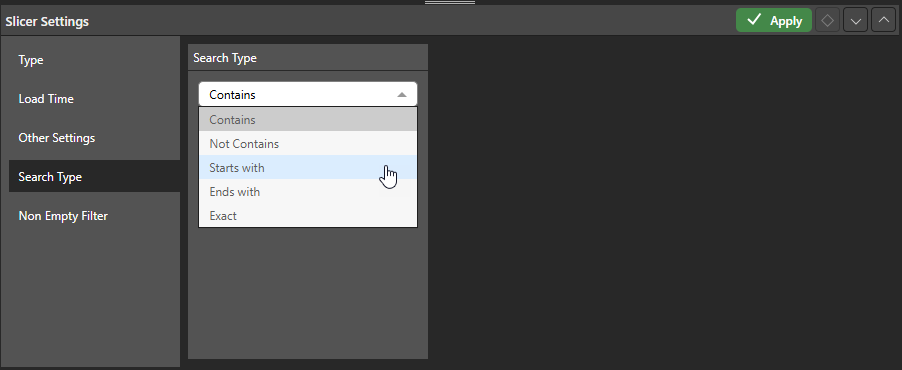
This will be applied to any slicer type that supports search (drop-down, text box, and tree):
- Contains
- Not Contains
- Starts With
- Ends With
- Exact
Non Empty Filter
Go to the Non Empty Filter tab to hide empties from the slicer.
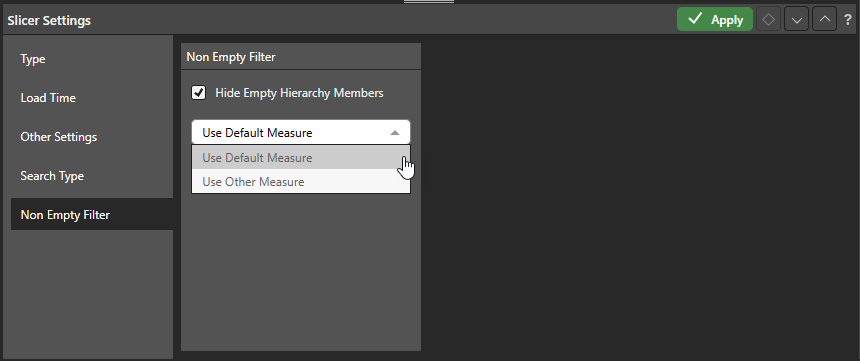
Hide Empty Hierarchy Members
Select the Hide Empty Hierarchy Members checkbox to hide any members from the slicer if they don't have any value for the given measure.
Use Default Measure
This drop-down is exposed when you select the preceding checkbox. The options are as follows:
- Use Default Measure: (Default.) Hierarchy members with no values in the data model's default measure will be hidden from the slicer.
- Use Other Measure: Select this option to hide empty hierarchy members using a different measure. This will expose a Measures tree, from which you can choose the required measure.
Filter Drop Zone
The slicer type can also be changed by dragging the slicer chip over the filters heading in the drop zone. This will open the slicer types menu. The slicer chip can then be dropped onto the required slicer type.

You can also disable or enable the background chip by clicking the Filters zone context menu:

- Click here to learn more about the Filters drop zone.
Related information
Understanding Slicer Reuse
When a discovery is added to a presentation or publication, its slicer settings (defined in Discover) apply to the discovery by default even if the slicer isn't itself added. For example, if Accessories was the last selection made from a Product Category slicer in Discover, the discovery is filtered by Accessories when it's added to a presentation or publication. (This filtering is also reflected in the breadcrumb trail.) If you add the Product Category slicer to the same presentation or publication, you can override this selection.
Tip: To prevent this automatic filtering, disable the slicer in Discover before saving.